[[help:event_checkin]]
Check In OzBargain Meetup Events
This page describes the process of using OzBargain's event checkin system for the upcoming meetups. There are 3 groups of users:
- Participants: those who have registered to come to the event. Usually by voting “Yes I am coming” on the forum poll.
- Organisers: user that is organising the event. It is the OP of the post node.
- Moderators: OzBargain moderators that can mange events and enable/disable the event for checkin.
For Event Participants
When you arrive at an OzBargain meetup event, you need to use your OzBargain account to checkin. To do that
- Open up OzBargain on your phone browser, and make sure you have signed into your account.
- Navigate to “My Account”, and go to tab view → events
- You shall see all the Available Events there
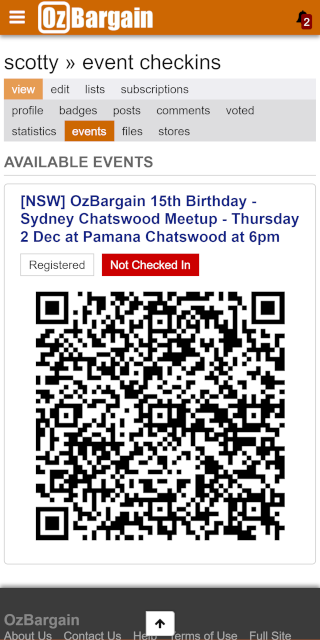
- Now you have to find the organiser of the event, and ask him/her to scan that QR code to complete the checkin process.
Alternate Method
Some events might have checkin QR code printed, where the participants can checkin themselves by
- Scanning the QR code with a scanner, i.e. Google Lens
- If the participant has previously registered for the event, an OzBargain page will come up to confirm the checkin. Click on “Confirm Checkin” to check into the event.
- A notification will be sent to the organiser so he/she will know that you have checked in.
Please note that for events that (1) allow unregistered users, or (2) have participants on waitlist cannot be checked in this way. They will have to find the organiser to check them in.
For Event Organisers
Managing Participants
There should be an event tab for your post where you can manage the event (add/remove participants, checkin participants, etc). If there isn't, ask a moderator to enable it for you.

You can see a list of participants registered for your event on that page + a few functions.

Next to each participants are:
- User – Username and the creation date of the user account.
- Event – total number of events that this user has registered for in the current calendar year, and those currently in waitlist.
- Checkin – User has checked into this event, i.e. is present at the event.
- Paid – for the organisers to manage which participants have paid for their “tickets”. Some meetup events have chosen to use a refundable $5 token to get a more accurate number of participants who might be coming. Use this checkbox to mark the users as “Paid”.
- T-Shirt – User has received a T-shirt. This checkbox might be already checked & disabled, when this user has already received a T-shirt from a different event in the current calendar year.
- C-Org – mark that user as a Co-Organiser, who is also able to use QR code scanner to check in other participants.
You can also manually register more participants to your event by using “Add Participant”. You can add multiple participants by putting in comma-separated usernames.
Event Settings
- Date – date when the event is happening, in the format of YYYY-MM-DD.
- Allow unregistered – when this option is turned on, this event will appear on user's event page on the day of the event even when the user has not been registered as a participant, and the QR code can be scanned by the organiser to check in this unregistered user. This is useful for events that potentially have lots of people coming who have not previously registered.
- Disable registration – when this option is turned on, users can no longer Register on the event's node page.
- Participant Cap – number of users allowed to participate in this event. Users can still register if this cap has reached, but they will be added to the waitlist. When someone who's currently registered cancels his/her registration, the next person on the waitlist will be notified.
- State & Location – where the event is held.
Check In Participants
There are 3 ways to checkin a participant.
Organiser Checkin with Username
A participant might come up to an organiser to request checkin to the event. Organiser would need to find the user from the list of participants, and then manually tick the checkbox Checkin next to the username. Having list of participants ordered by Username would make finding the specific user easier.
Organiser Checkin with QR Code
If a participant come up to an organiser/co-organiser with QR code under that user's events page, that user can be checked in by organiser/co-organiser scanning that QR code. Any QR code scanner should work, and opening the QR code will be directed to a special OzBargain page showing that participant's username, profile image and registration status.
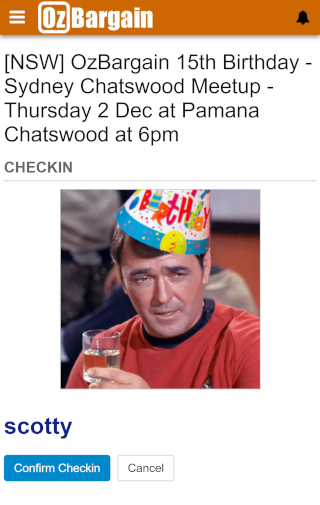
Click on “Confirm Checkin” to mark that participant as present at the event.
User Checkin with Event-Specific QR Code
Organisers can click on “Print Check-In QR-Code” under “Actions” to print out an event-specific QR code, where any registered participant can scan to confirm checkin. It is useful for large events where participants can check themselves in without tying up the organisers.
For Moderators
Extra options on the node event page:
- Actions → Enabled: Enable or disable this event for checkins. A disabled event will not be shown on participant's user-event page. The initial state of event is disabled after added to the node. It is recommended for a moderator to manually enable the event just before the start of the event so it's available for the participants to check in.
- Actions → Add Badge to Participants: Add “Not A Bot” badge to all the checked-in participants of this event. Moderator can do this after the event has concluded, and all people who came to the event has checked in.