
Marketplace
Very good price for anyone wanting some cheap shade for the yard
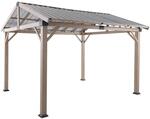
Mod note: Original title "Mimosa 3.62 x 3.3m Timber Gazebo" was misleading. This is not constructed from timber, it is made of aluminium frame and galvanised steel roof.
I'll summarise the big review below to save time.
It's cheap cast aluminum with poor welds. They simply thread into aluminum and it strips very easily. Holes don't line up… frustrating…but the installer is a muppet and thinks you need 16 dynabolts to hold a 3 x 3m structure.
Yeah, I've got a similarly constructed Mimosa gazebo. Cairo that they don't appear to sell anymore.
Had it up for a good 5 years I think and it's still holding up fine, but it's in a fairly wind-sheltered position. Only had to replace the cover as it got sun damanged which you wouldn't have to worry about with this one. Mine's on pavers so I just have a few Oztrail sandbags holding it down. Hasn't moved in some pretty windy storms.
But, having said that I would't be surprised at all if the alu legs bent completely in a storm, as they're pretty thin metal. If this one does go, I'll be upgrading to a sturdier more permanent structure. But it's been good for the price that's for sure.
My in-laws insist their Mimosa gazebo is too heavy to be blown away by the wind when I tell them they need to bolt it down. Waiting for the day it ends up in their neighbours yard…
I see the value but wonder how strong the frame is. It looks timber in appearance but the specs say alu.
Has anyone got this, if so, could they share their feedback as I'm considering it. thanks.
Have a look at the reviews on the Bunnings site, there are positive ones but one which is quite critical as well… I'll paste it below for reference (PS. My God… that's a rant, not a review… I gave up on fixing the formatting!):
Link for item/reviews
Good from afar, but far from good
Briana
10 months ago
Okay, buckle up, put your helmet on and get your reading glasses, because this is a long review. We purchase this gazebo as a "quick & easy" alternative to building one from scratch. When it came time to erect the gazebo, we found that every single piece was needlessly individually wrapped. There would have been a much smarter way of wrapping everything by weaving the wrapping in between the pieces.
Unwrapping the individual parts probably took 50% of the total time it took to erect which was very frustrating…. Anyway, once we started building, we found the following issues as we were going:
1) The extruded raw aluminum joiner pieces were all BENT during the manufacturing process, causing the 4 outside horizontal support beams to bow upwards slightly which put countless other screw holes in the project out of alignment. (this was probably the biggest headache of all). i think about 30% of the screw holes were misaligned enough to make me swear under my breath and required some serious heft and massaging of pieces and relieving holes to allow bolts to thread in…..
2) Lots of the threaded holes (which are structurally important) were simply tapped straight out of the thin aluminum tube that they are a part of, which is prone to failure. The bolts had to be gingerly tightened otherwise the holes would strip out. the problem is, that they really did require more torque on the screws to be strong…. so a LOT of the screws had to be left only slightly tighter than finger tight to avoid completely stripping out…..
3) The 8 holes around the top of each of the corner posts (32 in total) that connect to the four horizontal roof supports really should have had nuts welded on the inside with long, thick threads, but instead they were just tapped straight out of the base material with a thread length of no more than 2 or 3 mm. That's pretty bad from a structural standpoint and 2 of these holes stripped out with only a mild force applied. I had to rectify this with tec-screws…. not pretty…….
4) There was swarf inside almost every tube rattling around. You can imagine that over time these will be subject to corrosion and cause corrosion issues internally……
5) Many of the welds had large cracks and porous holes in them. In some spots very poor welding, i wouldn't even call it apprentice level. Not exactly confidence inspiring……
6) There was paint defects like you wouldn't believe. I think about 9 of the 14 roof sheets had rust bubbles underneath the paint on the top side… straight out of the protective wrapping…. So, either they had painted straight over the rust, or the surface was not prepped properly before applying the paint in the factory. I give it 6 months before the bubbles pop and expose the bare metal to atmosphere. Very disappointing……
7) Most of the Nutserts in the rafters where the roof sheet retaining studs thread in were misaligned. When it came time to lift each roof sheet on, and slipping each roof sheet over the upright studs, lots of the studs did not line up correctly with the holes pre-drilled in the roof sheets. I had to relieve 2 holes on about 12 out of the 14 roof sheets by about 15-20mm each to allow the roof sheet to slip over and slide onto the retaining studs. So that is around 24 holes I had to re-drill in the correct position myself!…..
8) Then, once you finally do put each roof sheet on, and go to attach it to the stud…. the large metal washers that go underneath the retaining nuts have an internal hole diameter that is WAY too big for the nuts they are supporting. This means that the nuts sink inside the washer with even the slightest tension (the nuts basically slip straight in to the hole and go through the center of the washer, so the washers serve no purpose) I had to go back to Bunnings and buy extra washers with the correct internal diameter to go on top of each of the supplied washers to stop this from happening. Unbelievable……
9) They only supply 8 dyna-bolts to secure the gazebo down to your concrete pad. A total of 16 are required. This is strange, because there is 4 holes at the base of every post for a dyna-bolt, but they only give you enough to put 2 dyna-bolts in each leg???? further to this, the bolts they do provide are so flimsy. do yourself a favor and Throw these away and go and buy some proper Ramset 10x50 or 10x75 dyna-bolts and do it properly. (Hint, 16 are required!!)…..
10) The way that the support pads attach to the bottom of the upright posts is measly at best… The metal support pads are dyna-bolted to the concrete pad, so they're not going anywhere…. but the bottom feet are only held onto the 4 upright posts by 2 tiny M6 bolts, each threaded into a bendy 2mm plate. what is the point, it now renders the bottom pads useless because I can guarantee you that if the wind ever did properly pick up, that the legs would rip straight out of the bottom pads and leave them dyna-bolted to the concrete wile your gazebo flies away in the wind. Insane if you ask me……
11) A more than acceptable amount of pre tapped holes on the bottom ends of the rafters were rusty straight out of the pack, and about 5 or 6 of the beams or connecting stringers had dents in them. Crazy……
12) The instructions that are downloadable from this very Bunnings product page are WRONG and outdated. they are missing steps……
13) The instructions that do actually come with the product (and while they do refer to the correct version) are painfully vague, and some of the drawings are pre-school level at best. The correct orientation of some of the parts is not made abundantly clear in the instructions. meaning that you end up taking a chance and can install a support tube upside down, without the instructions showing any possible way to identify upright or upside down. 3 hours later, when it comes time to bolting something else onto that piece, you realise what has happened, and have to backtrack hours of work and undo heaps of pieces to rectify. I was left scratching my head at some of the drawings……
14) The roof rafters mount onto the joists at uneven intervals causing issues with supporting beams not fitting in between……
15) the roof sheets are all a little too wide for the rafters that they attach to, so they all bow upwards slightly, making the roof look wavy……
16) the ridge capping holes are pre-drilled too long between centers meaning you have to massage the ridge capping to fit. this causes them to bow upwards. It looks silly….. Most of problems listed above are not really something you can inspect and identify straight away and return the product before you start building it…. The real problematic issues are the ones that you only find out once you've started, and in some cases, almost finished erecting it. This doesn't exactly provide the opportunity for you to take it back and ask for a refund.
Once it was erected, it is fair to say that from afar, it does look OK for the price point, but some serious thought is required and you need to be able to improvise. It took me about 2 full days by myself to fully erect it. All in all, it is clear to me that this product is poorly designed with very little thought and R&D. It is poorly manufactured, and obviously the people who did make it never actually tried to build one themselves, otherwise they would have seen all these issues. I understand that this product is coming in at an affordable price-point, but an affordable price-point should NEVER dictate or affect the quality of simple manufacturing elements that the entire structural integrity of something like this relies on. If you are someone who is not overly capable with building, or struggles with basic flatpack furniture then i would steer clear unless you have someone available to help for a couple of days who is handy with the tools and is able to think outside the box and improvise. Honestly if I could go back a few weeks and start again, I would have bought the materials and spent a few weekends building one myself.
Oh god. To have this much time in life would be such a blessing.
Or a curse… depending on how you look at it.
TLDR courtesy of our lord and saviour ChatGPT:
The reviewer bought a gazebo as an alternative to building one from scratch but encountered numerous issues. Problems included bent aluminum pieces, poorly tapped holes, paint defects, welding issues, misaligned parts, inadequate instructions, and structural flaws. The assembly process was time-consuming and frustrating, requiring improvisation. Despite looking okay from afar, the reviewer concluded that the gazebo was poorly designed and manufactured, urging caution for those lacking building skills. They suggested building one from scratch as a better alternative.
would it be cheaper to but the raw materials that this kit?
I built this exact model just a month or so ago. It was missing a couple of side pieces for the ends of the roof peak, but they aren't hugely important. Aside from that I did have issues getting the roof beam supports to fit properly as the tolerances aren't particularly precise. However, we paid $1,900 for ours, at $500 this is an absolute steal! I disagree about the 8 supplied dyna bolts not being enough, once installed this thing feels solid as a rock.
I purchased it when it was $1900 4 years ago and if it’s still the same then it is a bargain indeed. We have been happy with it this whole time. The wood needs to be re-stained but no issues from our one. Yes most all places you will need a building permit due to size and you will have to consider the footings cost 500x500~600x600mm concrete footings for each post depending on your area. (Wind factor) I needed to have 600x600mm, but your local council will let you know
What wood needs to be re-stained? Apparently it's an aluminium frame. Maybe you bought a different model
Don’t you stain your aluminium wood?
16 or so cement screws= Perfect small car port,
or 16 or so cement screws and 4 side panels, cut some front panel for door and side for small window= Perfect small car garage.
From Bunnings -
Hand brushed timber look frame
Galvanised steel roof
Includes all hardware required for assembly
Size: 3.62w x 3.3d x 2.78H metres
Low maintenance
The bloke getting the $33k quote on ozb needs to sus this out
Yeah, even for a double carport thats a crazy quote.
stratco wanted 4K for supply only
I need the width to be like 3 times as big to fit 3 cars in.
Unsure if worth getting 3 of these as the poles might take to much space
Should be perfect for your Kia Picanto, Fiat 500 and Volkswagen up!
Why small car? It looks big enough to fit a lifted landcruiser
High enough but not deep enough tho
Free alternative: make a comment on OzB that jv doesn’t like
Would this suit as a small car port for a small car cheers
Wouldn’t you have to measure your car to see?
What you got a smart car?
Does this need s building permit?
Ask @JV he knows about pool permits regarding the $8 ice bath yesterday lol. He should be up soon shouldn’t he?
Nah I wouldn't think so, usually only it it's attached to the house or within 1m of a fence line
Yep in SA verandahs always need an approval, no matter how small. Unfortunately people often get this confused with the under 15m2 garden shed in the backyard exemption.
The bigger issue is that this thing is very poorly designed so would be unlikely to get a building consent. If you look at the review that someone posted above it’s pretty much junk.
So in essence, legally you couldn’t build this in SA. If you take a chance it’s probably going to rust out or break before anyone notices especially at the fixings which sound terrible. Wouldn’t imagine insurance would cover any damage it does when it fails if not approved.
Yeah I was wondering the same for VIC
I was planning to build something very similar sized but with a Laserlite roof instead, but this could work well.
Could the steel roof sheets be repurposed as a wall?
Pergolas under 10m2 are generally fine, but can vary by council. As soon as something's attached to the house (an actual veranda) then it needs a building permit, but free standing does fall under the same rules as a garden shed.
But this is a gazebo not verandah though?
Yup. Difference is whether it's attached to the main building or not.
I think it does in Victoria if classed as a freestanding class 10a building as it is >10m2. I don't think it classifies as a pergola which allows up to 20m2 as it has a non-permeable roof.
https://www.vba.vic.gov.au/__data/assets/pdf_file/0006/13614…
Not a builder though. Happy to be proved wrong.
so drill holes in the roof?
This post is correct - a pergola has no roof sheets whereas a verandah does have roof sheets. In SA whether freestanding or not verandahs need an approval technically, not totally sure about Vic but probably the same.
As a building inspector and someone who helps check and issue permits a building permit is definitely required.
I measured mine and it is less than 10m2 floor area, dimensions given are for the roof. Any other reason it needs a permit in Vic if freestanding and away from a boundary?
What's the typical cost to engage someone to assemble it for us?
$20k in Sydney
20k for labour in Melbourne, plus another 10k for traffic controllers for when you have it delivered, plus another 20k for delays and the extra week required for construction due to slight spots of rain and the 1hr the temp was over by 0.5c
10k for traffic controllers for when you have it delivered
Cause you need 7 traffic controllers, 6 of them on their phone and 1 vaping
$0 DIY.
If one says wtf this and labour cost, wouldn't be an insulting sentiment and upon that our very homegrown rednecks would say for anything made in the non-west countries:
"bat, bat, it's/dey ar meyd in cyynaa, indiyaa, chiep leybor, puur kuvality, dunt ekpet mac'
Here you go. Our very own good quality material and good labour, good tradies, lazy baggers officers.
@michael9865: Yeah, bending the trolls is harder than bending the rednecks. It seems your comprehension level even worse than theirs.
@michael9865: Yeah, as an English professor, I call your communication skills as non-existent.
Yeah, Engrish prof, yeah… See how hard work is bending a troll just like an Engrish prof.
it took me 3 weeks lol
Stop checking ozbargain every 5 min and you should get it done in 2 days
ripping the protective film off the metal sheets took me two days
can you add walls/blinds to it?
Wish they had these in 4 x 4m or 4 x 5m to use as a carport
How about joining two?
Almost 12m2… some councils might require permit! Dont forget to factor that into your costings
So $20k labour plus $1k council application + $2k random council levies that dont make sense (like something something park development levy when they havent touched the park for 15 years, they should just be honest and call it mayor buisness class flights and 5 star hotel bi yearly holiday levy) + $10k bribe to allow mounting the gazebo on Neighbours fence
For my council, it's the height that is the issue.
A building permit is required for a pergola or shade sail as follows:
20m2 or larger
Higher than 2.4m
vs
Size: 3.62w x 3.3d x 2.78H metres
Mine requires permit for anything over 10m2 if there's covering!
I belieev that is floor area, which this is below 10m2, just. dimensions given are for roof.
Honestly, this seems like a decent deal just for the roof. The legs are going to be the weak spot, so I could see someone just replacing the legs with some hardwood posts properly fixed to the ground and slapping the roof on top to get a decent car port or covered area…
Rural delivery free for me with OnePass
Rookie question, would this need to be bolted down, or could I have it sitting on top of a deck for a bit of shade and not bolted down. I could possibly tie it to the handrails if I needed to stabilise it, but hoping that I wouldn't need to bolt it to the timber deck.
Thanks all
You'll need to bolt it down or it will take off in a high wind
Thanks. I thought that might be the case.
Free delivery for me in Canberra lol- no passes needed
Free delivery in Melbourne too :)
I wonder if there’s a way to weigh this puppy down (without attaching it) for a temporary carport
Would need to have enough weight for Melbys 4 seasons in one day though!
Tie it down to something heavy. Surely you don't need to wonder about this?
I got one of these. https://shedsandcarportsonline.com.au/product/horse-shelter-…
Not as cheap. But easy to assemble. And was able to secure easily.
got mine delivered today. So glad it came before Xmas.
Decent quality components?
sorry, I haven't opened it yet.
How did they let you know when it was going to be delivered? My order is still at "Status: Order Taken".
i got a text of the expected delivery time and they turned up as expected.
Same, it's also disappeared from the Bunnings site entirely. Starting to think they sold more stock than they had and it will be cancelled.
I emailed yesterday and got a reply from my local warehouse saying its coming today. We shall see.
Delivered in three 60kg boxes. Still boxed.
Our trampoline flew over our house in a storm on Christmas night, so I will pay attention to footings and tie downs on this :).
Hi, I’m hoping to be able to attach the posts to footings and wondering if you have calculated the requirements for this?
Did you guys experience any faulty parts?
My B and B1 are mixed up in the box. And then missing screw points on part D.
Although Bunnings support is efficient, I'm getting frustrated with the delay.
Just got mine yesterday, Not off to a great start b1 and b2 are not cut square making the fixing of the sleeve and bracket difficult, I've already rounded off one screw head!!##.
I initially thought it must be designed to have an angle but clearly not.
Hope things improve!
Just in case anybody is still monitoring this were your Z pieces (the sleeves that join the roof rails) straight? MIne are definitely curved, only by a couple of mms at each end but its enough to stop the rails joining squarely and a nightmare to get the screws fixed. I'll have to try for replacement bits from Bunnings support.
Mine were like that but I figured it was because they were joining in the middle of the beam and once the roof was on the weight would cause a sag, eliminating the curve. Mine is all assembled and looks fine. I believe the curve is intentional.
At first I thought it was intentional but if so the rails should have been cut on an angle to accommodate this so the screws can be aligned properly.
The screw holes positions line up for the rail, insert and bracket if they are square and flat but once the insert is used they are out by enough that capturing the screw hole is a struggle. Will be interested to see what the supplier comes back with as Bunnings is following up with them.
One of the reviews on Bunnings site mentioned the same thing so I'm concerned about other problems this will cause further on in the build but thanks for the response anyway.
below is copied from earlier in this thread
"1) The extruded raw aluminum joiner pieces were all BENT during the manufacturing process, causing the 4 outside horizontal support beams to bow upwards slightly which put countless other screw holes in the project out of alignment. (this was probably the biggest headache of all). i think about 30% of the screw holes were misaligned enough to make me swear under my breath and required some serious heft and massaging of pieces and relieving holes to allow bolts to thread in….."
If anyone is following this thread and has the instructions, can you tell me the distances between the legs/uprights? I need to concrete the footings before I get the boxes transferred to me from a mates place. It is going in on pavers that sit on sand so I need to pour concrete under the pavers and secure them down before I start putting it together.
Need to have everything ready for the boxes to be delivered and then erected and bolted down on the one day!
Or can I just rely on the docs from this listing: https://www.bunnings.co.nz/mimosa-3-62-x-3-3m-mullaloo-timbe…
No quite timber,
features a durable, rust-resistant aluminium frame which has been beautifully hand painted to give a timber look appearance