• expired

Primacoustic London 10 Room Kit $859 @ Sounds Easy

100

I have been looking for some acoustic treatment for my media room and this 25% off seems like a really good deal for this kit. Not sure when this deal ends. It was around $1200 at most places when I looked before Christmas.

These are not cheap foam, but acoustic panels constructed of high density rigid glass wool with resin hardened edges.
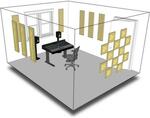
Kit contains:
• (8) Control Columns - 12" X 48" - 2" Thick - Beveled

• (12) Scatter Blocks - 12" X 12" - 1" Thick - Square

Designed for rooms up to around 11 sq m.

Here is a video demonstrating the result of using the London 12 kit: https://youtu.be/JsNN3nS9XeI

Related Stores

Sounds Easy
Sounds Easy

closed Comments

  • +9

    sounds like a good deal

  • 85.90 a piece ..pretty good..seen some on gumtree for 50 a piece but limited quantities..I hear some clark rubber mats are made for acoustic insulation.. may be a cheaper alternative ?

  • +18

    I built my own for $46 a piece with a pine frame and acoustic insulation. Made a massive difference to my home YouTube studio. However that price could be slashed if you used MDF which is what I'll do this year when I do our home theatre. (All specs listed in desc of vid)

    Big benefit of pre-built over not only requiring no time to build is their high density filling makes them super thin in comparison.

    But yeah, the before and after examples at the end are night and day, I honestly didn't even think it was that good until I got back and edited the clips.

    • +2

      Great video! I was actually planning to make my own panels, but the wife wasn't keen on the look of the ones I showed her.

      • I've seen people make them with movie posters printed on a stretched canvas. Sure you use the lowest thread count canvas you can get for max breathability but you can then have posters or artwork as the design

    • +1

      What an awesome channel!
      +1 subscriber

    • Great work to build that Youtube channel mate, looks (and sounds!) fantastic, just subscribed.

      If someone was looking to start a YT channel, would you recommend that Rode microphone that you used for testing?

      • +1

        I'd recommend the Rode VideoMic NTG as an on camera mic (it's the newer version of that VideoMic Pro) it's USB-C port also doubles as a wired connection to a PC so comes up as a USB microphone for voiceover or podcast work. But if you're not going to be booming it close to your mouth or holding it close in a vlog manner then the Rode Wireless GO is also an amazing wireless lapel setup and I use that for 50% of my shots.

        If you want the cheap route the Deity V-Mic D3 Shotgun Microphone
        has good reviews, so could be a great starter (just not USB-C direct into PC from my knowledge)

    • Great work dude..did you consider just sticking the clark rubber panels onto your frame they seem thinner than the insulation you used, though not sure if they are as good or better, cheaper or more expensive

      • You probably could to get around the appearance of foam panels. I just went the thicker route with insulation as wasn't fussed on the depth and it was pretty cheap for a bag of insulation batts vs proper acoustic foam.

        I spent so much time reading forums, looking at manufacturer specs, and creating the "ideal" setup on a budget is very confusing. Biggest thing is just breaking up the flat bare walls in any way, as any object will also provide some acoustic diffusion which is another whole layer to treatment of a room. Then for placement just look into your first reflection points as that'll provide the most benefit.

    • +2

      Could get a little side hustle on Bendigo buy, swap and sell mate :)

      • Not a bad idea if I was fast on the tools! I did get a bit of a workflow going by the end of it, but given I have more projects to do a acoustic panel side hustle will have to wait haha

    • Got to be careful with accoustic foam. I bought some that was supposed to be fire retardant…..I tested one panel before putting it up and lighting one corner burnt the whole thing out within 30 seconds…sigh

  • Can these be hung with 3M strips?

    • They come with impalers and I am pretty sure these can be mounted with double sided tape or the removable strips.

      • Thanks, was trying to avoid having to screw into the wall.. would make it an easier sell to the wife :)

  • +1

    How would you know where to place the panels? Wouldn’t it be dependent on the shape of the room, like how would a layman know where to put these??

    • +2

      general rules of thumb:
      1. break up huge, flat surfaces, but avoid dividing equally. (So if you had one wall and one panel, you'd want to put it somewhere around 33/67 or 40/60.)
      2. Focus them around ear height
      3. Additional pieces would be most helpful closer to sources of sound/noise (i.e. speakers, musical instruments)
      4. Have fun, the visual aesthetics may be more important vs the tiny bit of improvement you get from exhaustively mathematically optimizing your placements.

      • Ah I see. Also I'm still confused about what exact benefits these items produce? Less echo/reverb in the space for a crisper sound? I have no idea about this sort of thing.

        • +1

          yup, you nailed it, it's mostly reduced echo/reverb. camshandez actually posted a video with waveform comparison up above.

  • My mate got a bunch of huge rugs for $50 from Salvos and hung then in the home studio covering the whole wall. Made a fair amount of difference when we were jamming.

    • Anything that isn't bare wall will almost certainly give an improvement. Rugs, bookcases, soft furnishings, heavy curtains - they all help.

Login or Join to leave a comment