• expired

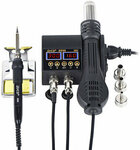
JCD 8898 2-in-1 750W Soldering & Reworking Station with LCD Display US$29.99 (~A$41.36) AU Stock Delivered @ Banggood

260
BG13d921
This post contains affiliate links. OzBargain might earn commissions when you click through and make purchases. Please see this page for more information.

This has been popular previously and it's back on sale. The AU$ exchange rate isn't quite as good as before but you can try stacking with cashback to save more. It also has an EU plug, however it's an IEC cable so you'll probably have one lying around.

  • Apply the coupon BG13d921 at checkout

AU$ based on current Mastercard rate and shipping from AU warehouse.

Mod Note: US$30.67 delivered if your shipping address is affected by the no-free-shipping website bug.


Features:

  • Hot air heater and welding iron 2in1 rework soldering station.
  • Dual LCD digital displays to show precision temperature.
  • Extremely low noise and space saving design.
  • Intelligence self-detection function features safe personal operation.
  • Automatic cooling function for effectively prolonging the heater's life and protecting the hot air heater.

Hot Air Heater:

  • Working Voltage: AC220-240V OR AC100-130V
  • Frequency: 50Hz/60Hz
  • Output Power: 750W
  • Temperature Range: 100°C~480°C
  • Temperature Stability:±2℃
  • Air Flow: 150L/min (max)

Soldering Iron:

  • Working Voltage: AC220-240V OR AC100-130V
  • Output Power: 80W
  • Frequency: 50Hz/60Hz
  • Temperature Range: 180°C-500°C
  • Temperature Stability: ±1°C
  • Soldering Iron : ESD design
  • Heater Material : Ceramics

Referral Links

Referral: random (171)

Referee gets $2 in coupons. Referrer gets 10% off (if referee spends over US$10)

Related Stores

Banggood
Banggood

closed Comments

  • Is this any good? I only ask because I've had one blow up on me.

    • I've used a model similar to this (but not this exact one or brand). It has been fine for the year I used it for a project, and then the occasional time I need to fix something else since.

  • +1

    The cheapest I can get is US$35.27 delivered without "10% Allowance", US$30.67 delivered with "10% Allowance", whatever "Allowance" means. How to get US$29.99?

  • Bought recently and quite impressed with it given the cost. I'd suggest buying a better soldering tool holder though.

  • I love their Frequently Bought Together items on the same pages. I don't need a bloody watch for soldering (one was showing).
    They never offer actual useful things like Flux, solder, replacement tips (which would be handy) and so on :-)

    • +2

      soldering is so fun, u defo need a watch to not over-indulge… n end up with a statue of some sort

  • can we reduce the price with referral credits?

  • Sorry but I'm new to this stuff. I want to solder pc components and small pc cable ,
    ( 18 to 26awg). Should I buy this one with Temperature control or the 25w from JayCar ($15).
    Price isn't a big issue with me because with this deal , I can get a temperature control + a heat gun ( it's useful for me, I normally use lighter for heat shrink).

    People told me this 80w will damage the computer components, too strong power for my need.

    • +1

      80W is the maximum heating power for large components/thick wire with thicker tips. Tip temperature control is the key to get good soldering. Set it to around 320-350C for good solder flow/joins. Buy some spare tips with larger sizes for thicker wires etc:)

      • Sounds like you know what you are talking about. Would you have any idea about the hot air temp?
        On a lead free soldered board, what temp to say to remove a 8 pin SOIC chip?
        I have had little success with hot air removing stuff off the board and have made a mess melting the plastics of connectors and stuff. Possibly burning stuff.
        And adding leaded solder too to make it melt better but still not that good.

        Honestly had more success with soldering iron and solder sucker, solder wick without destroying the components and board.

        With the hot air I have great success stripping paint off the windows and trim without burning like a normal heat gun.

        Thanks.

        • +2

          For a soic-8 chip, hot air is not the preferred method of chip removal.

          The most common method destroys the chip, but as you're probably replacing a broken chip, that's okay. Use small wire cutters with pointy tips. One at a time, cut each of the chip's legs at the point where they meet the plastic body of the chip. When all of the legs are cut, remove the chip body with tweezers, and then use a soldering iron to remove each pin, using more solder if needed. Use wick to remove remaining solder.

          If you don't have fine-point wire cutters, you can cut the leads with a scalpel, but there is a risk you'll accidentally cut the tracks running under the chip. Use a #10 scalpel blade (rounded shape). Put the scalpel at the junction between the chip's body and legs, and press down on the scalpel while rocking it back and forth, so you are actually cutting all the legs on one side of the chip at the same time. It should take at least ten rocking actions to cut through, and be careful to stop the instant the blade cuts through. Continue as above.

          Another method that works with smaller chips like soic-8 is to get a thickish bit of copper wire, like the lead of a 1-Amp diode. Bend it in a U-shape, so you can fit it around the chip, and it will touch all of the legs. Solder the wire to all of the chip's legs, using plenty of solder. Now you'll find that soldering the last pin actually melts the solder on all pins, so you can pluck the chip off with tweezers, and the wire will usually stay stuck to the chip. Clean up with wick.

          If you can't get all eight pins to melt at the same time, it's probably because your soldering iron doesn't have enough power. Get a helper, and try two soldering irons, one on each side of the chip. You can also try cranking the soldering iron temperature up by about 20 degrees, but that risks damaging the PCB.

          If you do have to use hot air, melting and de-soldering nearby components is always going to be a hazard. It can be reduced though. Get some thick aluminium foil, like the foil from under a meat pie. Cut a rectangular hole in it maybe 2-4mm wider than the chip you want to desolder. Hold this against the PCB so the chip is visible through the hole, and use the hot air to desolder the chip through the hole. Bent-tip tweezers help a lot here. The aluminium foil stops the hot air from directly affecting nearby components, and acts as a heat-sink for air passing it. The closer you can get the foil to the PCB, the more protective it will be. You can also try deforming the foil, so it touches the PCB around the edges of the hole.

          Also, when de-soldering, you'll have much better success with a thicker tip on your soldering iron. Thin tips don't transfer as much heat, making the de-soldering much more difficult. A higher-wattage iron helps too, you'll be struggling with a 20-Watt iron. This is why commercial soldering irons are usually rated at 60 Watts.

          • @Russ:

            and the wire will usually stay stuck to the chip.

            I forgot to add, that the chip can usually be recovered too, when using this method. Hold the chip down to something heat-resistant (e.g. a ceramic tile, or some wood you're willing to damage), heat the wire, and pull the wire away with the soldering iron. Clean up with wick.

            Sometimes the wire method also works for chips with an exposed pad soldered underneath, but it depends on how well the exposed pad loses heat into the PCB's groundplane. The big advantage of the wire method is that when it doesn't work, you can cut the wire in half and remove it, and proceed to a different method of desoldering.

            • @Russ: Thanks for the long write up. I think I did cook the 8 pin SOIC chip (serial flash), it reads (not repeatable) random data.
              It was a spare board just, I was just practising with hot air. Trying to learn some new skills.
              I did use Kapton tape as well but that did not go well, I added plenty of flux, that makes a mess too.

              Watching youtube videos look pretty easy and magical even using hot air.

              Lead free solder sucks to desolder, I added fresh leaded solder, did not help. Would like to try chipquik removal solder but that stuff is so expensive.

              I did watch a video too removing components too with a copper wire, they made it look easy too.

              I tried hot air soldering, with solder paste, that did not go well either. Did not see that floating surface tension thing, I saw things blown off the board.

              I was trying to figure out what air temp was good for other people, I really have to turn it quite hot before I see anything start to melt, on the display I recon 400+ degrees. I cannot remember.

              I can only keep practising.

              • @fredk1000: Like yourself, I grabbed a few boards to play with desoldering things. One thing I don't see mentioned here…….did you carefully scrape around (rough up) the solder surface with a pointed blade in case there was any protective coating over it. I found a few like that that magically desoldered easily once I did. Am only an amatuer myself so take with a pince of salt :-)

                • @Borg: Thanks for the tip, I will give it a go.

                  • @fredk1000: Oh, and you will find this kit works well compared to a yukky 25w Jaycar soldering iron. I did. Being 80w gives one more control and has avail power to set temp high (400c) where needed for quick desoldering. 350C is usually enough though.

                • +1

                  @Borg:

                  in case there was any protective coating over it.

                  That's called conformal coating, and there are many different grades of it. Many are softened by acetone, and can be mostly removed by scrubbing with a cotton bud dipped in acetone. Bulk acetone is available at hardware shops like Bunnings, in 1-litre bottles and larger cans. Beware, it's extremely flammable, and melts or dissolves many plastics, but not any electronic components or PCBs that I have come across. Possibly you could scrub the markings off electrolytic caps with it, if you tried.

                  Take care where you store the acetone, it must be in a cool place, and not in the sun.

              • +1

                @fredk1000:

                I tried hot air soldering, with solder paste … I saw things blown off the board.

                I would not use this hot-air tool for soldering. De-soldering only. Commercial vapour-phase reflow ovens have low gas flow, for exactly this reason.

                Soldering with paste is difficult, and hot-air soldering with paste even more so. I know someone in the automated electronics assembly industry, he told me of many of the difficulties, so I haven't even tried.

                One of the big problems is that the paste has to be quite "tacky", to hold the component in place as the solder melts. And you want all of the pads of a component to have their solder melt at the same time, or you end up with "tombstoning". Once paste gets more than six months from the date of manufacture, it's thrown out, as it's not tacky enough.

                For using hot air to de-solder a component, try this. Put the hot air gun on the desk/bench, and use a vice or similar to hold a bit of solder wire about 3mm in front of the nozzle. Turn the airflow to a low setting, and start the temperature at 180 degrees C. Step the temperature up in 5-degree steps, waiting 30 seconds at each step, until you see the solder wire melt. Now you know the minimum temperature to use. In practice you'll need to use a higher temperature, as the tracks and groundplanes on the PCB will "suck" heat away from the joints you're trying to de-solder.

                Leave the wire in place for a minute or two, and that will give you an idea of how large the "hot zone" is for that nozzle. When de-soldering a component, you want the nozzle to be sufficiently large that the entire component will fit inside the nozzle's hot zone. If you want to de-solder a component that is larger than the nozzle, that will require you to sweep the nozzle back and forth across the component, and that's a skill in itself.

                Note that using a small nozzle will usually increase the airflow, which sometimes won't be desirable. Sometimes you'll have to use a larger nozzle to keep the airflow low.

                • @Russ: Looks like I have been doing a lot of things wrong.
                  I will try what you suggested the next time I try.
                  Thanks for the detailed reply.

                  • +1

                    @fredk1000: and @Russ….Am enjoying the reading as lots of great points above and learning some nice new tips and tricks : -)

                  • @fredk1000: Happy to help.

                    One final tip: when hot, the bond between the PCB's copper and fiberglass is much weaker, making it very easy to peel off a pad when removing chips. When testing if the solder has melted, do it by nudging the chip sideways, not by pulling up on the chip.

                    PCB pads are strongest along their long axis, so nudge the chip in the direction of the long axis of the pads.

                    • +1

                      @Russ: Yep, had that problem too.

                      I had a Arduino pro micro, the micro USB came off, it actually came off clean without damage (lucky), just the solder joints to the connector failed, traces were intact.

                      It was then I thought I tried using hot air with out the hot air experience. Nope made a mess, pretty much all the traces came off, the plastic on the connector melted a bit. I wanted some of that surface tension magic. Ruined.

                      If just I used a soldering iron and re-did it, it would of been an easy job.

                      But in the end I did save the board to use, I solder wires directly to the traces and components to get it to work with USB again. Fine for what I wanted to do with it. Wasted many hours.

                      But the board connections are pretty micro, my vision is not so good. Using a magnifying glass.

                      Will hopefully learn with experience. If not works well stripping paint on smaller jobs without burning the wood.

                      Thanks.

  • Not able to make purchase, PayPal payment stacked, newer reach its page to confirm payment. But get Banggood email with confirmation that purchase is successful. Strange.

  • This one looks ok if you want something a bit more higher end:

    https://m.banggood.com/Saike-220V-909D+-Rework-Soldering-Sta…

    Was $237, now $124 ish.

    Edit: maybe not so much more “higher end”, rather comes with a PSU.

  • -1

    Looks as this is fake deal, Banggood do not accept PayPal till sale. I'm trying to take one from all my devices, not connections with PayPal. No reply from them on my emails yet.

  • Will one notice a huge difference in performance between using something like this vs, say, something like the Hakko FX888D?

    Basically, I have a laptop where the bios chip is corrupted and I think I accidentally shorted and fried it so I need to replace it. It's an 8 pin soic-8 chip (laptop is an xps 9550).

    So, since I messed the chip, I need to desolder it, flash a new chip with the bios, and then resolder onto the board. The laptop is quite old and i can live without it, so I wouldn't mind the tinkering and upskilling as soldering electronics is also related to my studies.

    Because it's just tinkering I don't want to spend too much on soldering equipment, but I'm happy to spend more if that will help get a good result. So would it be worth spending more on something expensive like the Hakko FX888D or will this do?

    Thanks everyone

    • +1

      This is just for tinkering with where as the Hakko FX888D @ 4 times the price and just for the Soldering Iron (no hot air blower) is going to be a much better/more reliable device long term I would imagine. If you do a lot of soldering and looking for something long term, then the Hakko would be better.
      Having said that, this JCD device is decent enough for the price for occasional small jobs. Personally I would rather just have separate devices (Iron and Blower) to save the bulk as rarely use both at the same time.

      Unfortunately I don't have a Temperature gauge to see how accurate this JCD device is Or how well it retains it's heat when soldering. The Hakko reviews well for that.

      • Thanks for the reply. This looks like a good purchase for now given it's not something I'll necessarily be doing a lot.

  • Looks like this has expired?

  • +1

    Does anyone know if we can get this deal activated again?

    • I'm also interested if this deal goes live again.

Login or Join to leave a comment