


Marketplace
I must note that out of the box this machine does need tinkering. If you want a no faff/fuss/setup 3D printer. Then this isn't the machine for you.
Referee: $10 off 1st purchase.
Referrer: $10/$20/$30 off $100/$150/$250 Spend.

Yes.
oh wow, thanks for your reply.
Have you done it before?
Are you able to tell me how long it would take to print a whole printer ?
About 3 minutes to print a printer but the materials will cost you $13.37
I want one to print me a replicator like they had on Star Trek.
when you say "no faff/fuss/setup 3D printer" is not this one, what do you mean. If you like tinker will it do a decent job? I want to step into 3d printing and $399 seems pretty good price.
also, from your other thread, this is the upgraded cocoon model?
thanks
Yes, this is a minor upgrade to the Cocoon Create previously sold at Aldi.
As for the fuss bit. Before each print you should/need to check that the print bed is level. Leveling is done with 4 thumb screws. It doesn't take long but it is fiddly. Here's a video of the process: https://www.youtube.com/watch?v=X_3ILsgWB8Y
If the print bed is 0.1mm too high or low. There's a good chance your print will fail. 0.1mm is the thickness of a piece of paper.
But at this price point. That's what you get. The good thing with this printer is that there are a lot of people all around the world with it. And many of them are tinkerers. So there are so many mods you can print for the printer.
Having said all that. I've replaced the leveling screws, lock nuts and added a washer (between the spring and the print bed). And I haven't had to adjust the bed level since (I've done 4 prints since this "mod").
great thanks. Interesting about the leveling, that is small tollerance. You have a link to the mod you made, keen to have a quick readup of the community discussions if possible before I commit.
I really want to start making parts for my FPV drones and my kids want to make "stuff", this looks like it should work. Not that I know anything about 3d printer! haha
The mod I did was just to replace the 4 screws (M3x25 from memory) which hold up the print bed from the aluminium plate. I replaced the stock lock nut with my own (M3 lock nut) as the included one was sub-par. And I added a (M4) stainless steel washer (in each corner) to stop the spring from making immediate contact with the print bed as the spring can potentially wear through the insulating layer and short the heat bed. That's it.
I'm also in the process of applying this mod:
http://www.thingiverse.com/thing:921948
Which is meant to improve print quality.
I store my filament in Ikea Samla boxes:
http://www.thingiverse.com/thing:743280
This is a picture of my setup:
https://www.dropbox.com/s/i0jzf9u5df67xml/2016-08-28%2009.41…
Oh and I have a Raspberry Pi setup with OctoPrint as my printer is in the garage. OctoPrint allows you to control the printer remotely over your home wifi.
@bluechan: have you got any detail pictures of the mods to base?
your setup looks great, thanks for the pic. Think I'm going to pull the trigger.. any tips on best place to get filament?
@cookie9: Sorry I'm busy tonight and I'll be busy for the next couple of days. I won't be able to provide detailed instructions. But it's pretty straight forward. I'm sure you'll be able to figure it out.
But here is a list of things you'll need for the mod:
4 of M3 x 25 Screw (I got mine at Masters: https://www.masters.com.au/product/900043382/champion-m3-x-2…)
4 of M3 lock nuts
4 of M4 washer (I used stainless steel but ideally you'd use nylon or something non conductive)
While your at it. You should also try to source all the necessary M3 screws for the Z brace linked above.
Worth noting that I didn't come up with this. It's just stuff I picked up from Youtube and 3D printing communities.
@bluechan: Z-braces don't really make a huge difference when running at stock speeds, it's main benefit is making the printer more solid and less likely to fall out of adjustment due to vibrations. Also means you can print faster without loosing quality but on it's own you won't see a difference. Change the cooler though and you'll definitely see an improvement in any print jobs that have bridging.
Here's a link to a before and after photo I took when I installed a new cooler http://www.thingiverse.com/make:254799
How do you level something within 0.1mm using thumb screws?
That's the fiddly part. But you use a piece of paper and slip it between the extruder and the print bed. There should be a little bit of friction. Watch the video I linked to above. I'm getting to the point now where I can eye ball it now.
@bluechan:
Does that work for you? I know that's the method the manual recommends, but I found levelling very hard that way.
I found a different method:
* Download this file: http://www.thingiverse.com/thing:34558
* Slice with 0.1mm layer height
* Print
Now while it is printing, you adjust the thumb screws until you get a perfect thing well-sticking layer. It takes about a minute to print each square, which is plenty to adjust the nearest corner.
Since I figured that out, I barely re-level any more. Maybe once every 30 prints, and it just takes 10 minutes to get it absolutely perfect. Not fiddly at all :)
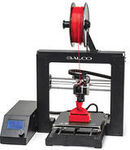
I got the Cocoon Create from Aldi earlier this year, which I believe is identical to this one.
Yes, if you buy this one, you better like to tinker. My first month or so, I had a lot of failed prints and a lot of frustration too.
To use this one efficiently, you need to understand a lot about it. Not so much about electronics, but 3D printing itself, i.e. types of filaments, surfaces, temperatures, adjusting.
So there's a long learning phase, but now that I'm through that, I get beautiful prints out of it with ease, even better ones than my colleague with his $2000 printer, and much better than test prints I got from office works.
And that's the main difference between this one and a $2000 printer. You need to learn how it works in order to use it. But for me this turned into a great interesting hobby.
Although my initial excitement phase is over and I don't print every day any more, I'm still using it a lot. It's great if you like DIY stuff, good for household items, tools, toys, art.
Great quality printer, snapped it up at the previous $400 sale. It's a rebadged v2.1 Wanhao I3 if you want to look it up as well.
Excellent quality, active community and good support.
I was able to print from opening the box in 30 Minutes, which was surprisingly fast. Recommend buying at least one reel of 1kg 1.75mm PLA in whatever colour you like, as the included filament is 10m samples that are ok but won't last too long.
I actually got one of these because it's a tinkerers dream. At a minimum I recommend one of the z-brace mods(http://www.thingiverse.com/thing:1549403) and changing the cooler on the hot end(http://www.thingiverse.com/thing:1025471)
Also you can get 20% off filament via Cocoon Create if you use an education email address to order.
You have to be prepared to work and experiment (which for me is half the fun) with these machines to get an understanding of how they operate and get good performance. If you don't want to play around then generally you probably shouldn't be in 3D printing as even once you have a fine tuned machine you need to work with the models before you print them as the machines only do what you tell them to.
What does changing the cooler do for you?
I never quite got why you'd need it, so I removed mine to find out and I can't tell any difference.
When you print something that has a any sort of overhang gravity will cause it to droop, you prevent this by getting the hot/liquid plastic to cool as soon as it's in place before it can deform. The stock fan isn't particularly efficient and if you look it's blowing only from one direction of the print and it's not even centred on the nozzle it's off to one side.
Here's a link to a before and after photo I took when I installed a new cooler http://www.thingiverse.com/make:254799
Oh, I never thought about that. That's in fact a problem I sometimes have.
Thanks for that :)
It's probably the most noticeable visual improvement I've gotten after a mod. Most mods are about making print's less likely to fail or faster. I ordered a fan from china for <$1 delivered the nut's and bolts I had here left over from other projects and the print can be done in an afternoon.
are these 3d printers able to mass produce themselves or are they only the high end expensive ones ?
Looking to start a 3D printing company, calling it 3Dcopy