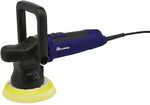

50% off Mechpro Polisher as part of Black Friday sale. Usual price is $99
50% off Mechpro Polisher as part of Black Friday sale. Usual price is $99
I've got the bigger brother of this one. Never thought of using the smaller one for headlight restores. Usually just do it by hand, scared I'd go to hard on the lights, lol.
Depends how heavy you usually start.
Im usually starting at 800 grit; no machine polisher and plastX will be anywhere near that agressive.
How would this go for smaller/tighter panel areas? I've got the bigger brother already but found it a bit awkward working edges and intricate bits. Not sure if the 125mm vs 150mm would make a huge difference in those areas though.
Smaller areas I usually go to a polishing ball on a drill, or just go by hand.
Takes 5 minutes to work a compound by hand in the 4 or 6 'corners' a vehicle has.
Unless you have a supercar or lotus or such with tons of sharp corners, there's not many intricate bits on most cars.
Once you've hand polished the edges to lay your masking tape, most will fit.
But, i mean, its a power polisher, it'll go like any power polisher, just remember it'll take longer with a small throw.
thanks for this write-up.
it gave a newbie like me, a good start,
as i am going down the path of taking care of my car's surface this summer.
just waiting for a good deal on a "Turtle Wax Ceramic Spray Coating" wax spray :-)
Good for using after every wash; but your original wax should be a paste. It just covers better.
Also;
https://www.repco.com.au/en/car-care-panel/car-care/wax/megu…
so, you're saying:
- foam wash car
- wash it off
- wax/buff the car, with wax paste
- then spray wax
- after 24-hour curing, spray wax again ?
PS:
i watched some Youtube videos about
Meguiars Ceramic vs Turtle Wax Ceramic,
and TW Ceramic was 'better',
but because TW is more expensive, so i guess that's why Meguairs is recommended
@whyisave: Nah; to be honest it sounds like you may be caught up in a web of youtube "pros" or possibly brand-guys like AMMO.
To get a great finish at home:
Wash the car with dish soap (this will strip all the oils and waxes leaving it bare). This is bad for the paint; so its not something you repeat often, but its essential for your first ever treatment.
Claybar, using just water and a few drops of dishsoap as lubricant. (This step is most crucial).
Rinse the clay/soap residue off.
Meguiars ultimate compound for paint correction (safest and by far the best ive used) seriously, you dont need anything else.
buff off
paste or liquid wax. (The first Should be dry, to buff off, as you finish the second panel, so just do 2 panels at a time; easy).
If you want to, THEN you can re-coat with a spray wax, to cover any bits you might have missed.
If you're going to do a proper liquid ceramic, you'd do it between the compound, and the wax.
There's no such thing as multiple hours between any steps; no binding-liquid i know, from water, to hydrocarbons; even aromatic oils, that wouldnt be "dry" by the time you've covered all the panels.
My father has a shelf full of classic show-car paint awards, so I grew up learning the basics.
So much is 'fluff' these days;
Just;
strip.
claybar.
correct.
seal.
What sealant works for you, is a personal thing.
I enjoy washing and polishing my car, so ceramic is of no use to me, I 'refresh' my normal wax well before its worn out.
Some people expect the rain to wash the car for them :p for these folks, ceramic coatings are great.
@MasterScythe: i have bookmarked your post now :-D
and yes, your post and many Youtube channels are just very technical for me,
because for a layperson with no foundational knowledge, those channels
don't explain the basics like your last bullet-points explained it to me.
it's just that i have a nice, shiny car, which is being neglected
and i just need to start looking after it, in this hot summer sun
(as well as think about reselling this car, in 1 years' time,…so i'm preparing for that!)
i already bought the Meguairs Wash (Gold Class) and Bowden's Wheely Clean too,
and once i got my wax sorted (hence, the buffer machine),
i was going to go down this rabbit-hole of 'car maintenance'
PS:
what is "claybar" ?
@whyisave: Machines are used for correcting; you dont need one to apply wax.
People DO use them to apply wax, because lazy :p
But wipe on, let dry, wipe off; with a paste.
Followed by a spray wax, would already be "fully protected", and then some!
Dont overthink it :)
If the car is new, yeah, use the megs wash, not dishsoap.
Dishsoap is to completely clean the paint of everything.
Edit;
Claybar is your best friend for sparkly new paint, and clean windshields.
Its a bar of clay you rub on paint to pull contamination out.
Its the most important part of any car paint care.
Think of it like using duct tape to get fiberglass, or bindies, out of your skin.
@MasterScythe: Thank you for your invaluable advice and guidance.
PS:
Meguiars UK : How To CLAY BAR Your Car
— https://www.youtube.com/watch?v=W3fdY7m0OJo
@MasterScythe: This is an awesome guidance. Thanks heaps!!!! Would you recommend any good wax for a brand new car? Also, once applied a wax can I top it up with something like this in between washes https://www.repco.com.au/en/car-care-panel/car-care/wax/megu…
Thanks heaps!
@wallaby12: Absolutely can. And its exactly what a spray wax should be used for.
If you wanna spend the time and money, autoglym paste wax really is good stuff.
Otherwise, the new rangeof turtle wax is good (throw out any old stock pre 2015 or so, it was horrid, the old formulas).
Meguiars entire range is easy to use and actually a 'big brand' worth the money for once.
When it comes to wax, anything in paste with carnuba is very similar; most of the difference is in how easy or hard it is to apply and remove (as in, physical effort).
If it was a new car; id be using;
Bowdens own nanolicious wash.
Meguiars "sealant" (used to be techwax 2.0).
And 303 graphene spray (not available locally yet, import only).
And after every wash; turtle "wax and dry" .
Prevents 100% of water spots, and refreshes wax super well.
But everyone has 'their brands' that work well for their methods, im not a gospel :)
@MasterScythe: I, too, want to add a thank-you to you for taking the time with your advice. It's people like you who make OzBargain the fabulous community it is - not just for bargains but also for advice. Thanks again.
with polishing experts here =) can someone help to get a small kerb rash polished off the alloy wheels? Had a pro to do it and he left one wheel undone in one spot and stopped responding to my messages (was months ago). He used some sort of polishing wheel with some paste and the other wheels came out ok
'Naked' alloy wheels are rare.
He likely disappeared, because cutting back alloy means you need to spray some new clearcoat, and he's worried you're going to "stay in contact" when the clear fails.
Regardless;
You want some 1500 grit wet and dry sandpaper.
Purple Polish or Autosol metal polish.
And a Powerball or cone, on a drill.
If you wanna do it right, you'd then spray a light coat of acrylic clear, and use something like meguiars compound to blend it in once its dried for a week or so.
But, if you're not confident painting clear; you can just use a cheap hard shell wax on the area, and keep it "nice" for longer than left bare.
I've got a bit of a situation and I'd appreciate some advice if you've got any more patience left in the tank. You've gone above and beyond with answering some of the comments on here.
I'm a tradie and went out on my own right before COVID hit. I bought a '99 Hiace fairly cheap to use as a work van to get me by until I can afford something better. For its age the paint isn't too bad but it has a bunch of tiny rust spots where the paint has chipped off.
I know its an old beater but I love my van and I want it to look its best. I've done a bit of touch up work on a larger rust patch with spray primer and spray coat and it turned out well.
I want to do a full paint touch up/restoration but I don't know the best way to tackle the rust spots as they're literally divots in the paint surface. Do I sand them back and respray or is there a better way? There's probably 50 of them so I'm hoping there's an easier option.
After that I'm assuming I use cutting compound, then wax, then sealant?
Appreciate if you have any advice. I nearly bought this polisher before I saw your comment about how long it would take to do a whole car. And I'm working on 3 times the surface area.
Rust spots are a tough one.
If you're lucky, all you're seeing is surface rust, and the original galvanising is keeping it "in its hole".
Without knowing the colour, its hard to suggest a method; but the key to stopping it is phosphoric acid. (Aka. " rust converter").
If the van is black, you're in luck, because phosphoric oxide is black (and inert, and paintable)! So covering it up is easy.
If the car is white, then its usually easy to hide white touchups.
Its even easier to hide, if your car has a clear coat (white and red usually dont); because you can clear, and blend, a slightly larger area.
Anyway, without knowing more, this is what id do;
get a LARGE drill bit
by hand, use the drill bit to clean the rust, and smooth the edges of the chip
pour rust converter in my (now clean) divot; allow to dry.
get a syringe and needle from a local chemist
use the needle to OVER-fill the divots with colour matched paint.
assuming acrylic; allow to dry for twice the recommended time (unless you've mixed up 2k, in which case a few hours is fine).
wet sand the raised "bumps" flat with 1500 or 2000 grit.
machine buff the whole area with megs ultimate compound
wax.
If it has a clearcoat, the comes after the wetsanding, and dont buff until a week later (try to park in the sun, we want the solvents gone!), and dont wax until a further week later; acrylic off-gasses for a LONG time.
Helpful?
@MasterScythe: Super helpful! More helpful than I was by omitting the colour. Its a white van, I think French vanilla is the official colour shade. No clear coat. I applied some rust converter when I first got got it in an attempt to stem the flow a bit.
Only question is do I use any sort of primer under the syringed top coat? Or just multiple layers of top coat?
@Jinxinferno: Multiple layers of top coat.
Phosphoric oxide (when the rust hits the converter) is like aluminium or copper oxide; its a natural sealant.
Primer is exclusively used to even a large area of colour, and special types (like etch) with acid, are used for bare metal.
Since we'll have neither, you're fine.
The imperfection of the repair will actually help keep the paint dots anchored.
Get your touchup paint at autobarn, not supercheap.
Both use concept nomix, which is friendly to use, but supercheap gets "e" series pigment (economy). Half the pigment of what autobarn gets provided; so twice as many coats for the same coverage.
Good to know if you're trying to spraypaint a fade to blend a repair; but 99% of the time, just a waste of cash.
@MasterScythe: Thanks mate. I had definitely gone down the youtube trap on this one and I think it did more harm than good.
Really appreciate you taking the time.
@Jinxinferno: No worries.
I was raised in the classic car scene, where They're both show pieces AND daily drives.
As such, while I know the correct ways, I also know how to "make do" when there's a show next week, or old mate cant afford a respray on his 20k candy paint, and every pro wont risk their name on a 'dodgy job' (fair enough; but still).
Fact is, the youtube fellas are probably correct; more correct than I am, on a technical level.
But, sometimes just keep facts simple, or you'll paralyze yourself with indecision.
rust needs oxygen.
paint needs an uneven surface to grip.
By following my tricks, you get both achieved; why over think it?
IF it fails, you're no worse off, follow a youtube 'extremist' approach and see if it works better for ya :)
9mm throw 125mm pad; its very "safe" but for its limited uses, you might as well go by hand.
The bigger one is a useful 21mm throw; and even the autobarn one is 15mm.
Its certainly good value, but if its your first polisher, imo you're better off waiting for a longer throw distance; because your results will either be painfully slow (so you wont bother again) or not much better than working it by hand.
Lets say, you do your hood; in 130mm or so areas. Thats what, 8-10 'rows'?
Each row is 30second to a minute of machine time (because you need to move slower, with a short throw).
Thats a literal 5 minutes on one panel.
Meaning a full half hour for a car.
Compare that to a 15mm or 21mm throw, where you get the same amount of 'rubbing' at almost double/triple the speed.
Thats a LOT of time saving when doing a vehicle: same amount of 'work' on the panel, for half the time expenditure.
Im probably going to buy one, for my motorbike, and restoring headlights; but just be aware that imo uses are limited.