• out of stock

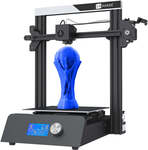
JGMaker Magic FDM 3D Printer US$109 (~A$157.69, US $50 off) Delivered @ JGMaker

140
JGMAGIC50

Congrats to everyone who snagged a bargain — these are out of stock now. I doubt we will ever see basic but decent 3D printers this cheap ever again.


Use coupon JGMAGIC50 to take $50 off, There is free shipping from Australia, so you’re paying ~$160 delivered!

JGMaker is clearing out their budget Magic printer. This is a great little unit. Equivalent to Ender 3 original, and a cheap way to dip your toe into 3D printing.

Print volume: 220x220x250mm

This is my 3rd budget FDM 3D printer deal, and this time with the lowest price ever. First deal was $179 delivered.. next was $169…. now this deal is sub $159!

I have one so … ask me anything!
Related Stores

JGMaker
JGMaker

closed Comments

    • +2

      It's a fairly basic model… "No frills". But still a easy-to-get-going unit, at half the price of an Ender 3 V2. Equivalent to AnyCubic Mega S, or Ender 3 original.

  • not mention if it's a heated bed and does it support petg..max temp at 245'C ?

    price is awesome ~~

    • +1

      Yeah the heated bed is mentioned in the specs - Heated Bed Temp ≤110℃
      And the images indicate it also, although they arent always the best reference.

      • thanks for pointing out, when I saw the "Easy take model" photo, if heated bed should be just scarp off, not like you have to bend the base to take it out…

    • +2

      Yes, you can print ABS, PETG and PLA on these printers. I recommend PLA+ as the best first choice.

  • +1

    Saw some YouTube reviews. QC seems bad.

    Does it have thermal runaway protection?

    • It says this on the page at the bottom:
      "Magic printers have thermal runaway protection enabled, preventing against out of control of temperature."

    • +1

      Yes it does have thermal safety systems enabled in the firmware.

    • +1

      You may have even seen my review on there 😉

  • Thanks for the deal - ordered.
    Can I just model something on FreeCAD and then export the model to some common format onto the sd card, put the card into the printer and then print it out?
    Where should I get filament for these?

    • +2

      I used blender and cura to slice and save in sd to print out, for filament quick one Amazon or cheap one from Ali (last order took ages due to lock down)

      • Thanks - I will look into these.

        • +5

          Remember, 1kg of filament will probably last a long time if you're just a hobbyist. Don't buy the cheapest stuff. It's worth it to spend a little more for something that you won't have to fight. I recommend eSun PLA+ for ~$30 on amazon.

          If you model something in CAD, you'd want to export a .stl file, then open it in your slicer program (like Cura), slice it into a .gcode file, then put that .gcode onto an SD card to run from the printer.

          PS. Level the bed. Especially the first time. Spend the time to do it properly.

          • +1

            @Wooluff: Thanks. Can these work with ABS also? I'm assuming 1.75mm filament is the size it needs.

            • +2

              @repeat: Yes to both. ABS is a little trickier to get the settings dialled in, but it should work. I've never tried printing in ABS, I just stick with PLA+ and haven't had a reason to switch. Remember, ABS fumes are toxic and the parts are more prone to warping while printing.

    • +3

      Export an STL from your favourite CAD package and then you can import that into the printer preparation software (your slicer, something like Cura), which produces a gcode file you copy to the SD card on the printer.

      Edit: Wooluff beat me to answering — thanks

  • The reviews on Amazon US aren't too bad

    OP how long is this deal on for?
    Also OP the discount code doesn't work for the printer + glass bed, any chance of doing a deal for the glass bed option?

    • +1

      It will run till it sells out, but at this stage I wouldn’t expect that to be much beyond this weekend.

      I’ve just asked the manufacturer if they can also do a deal on the printer with glass bed. I much prefer the glass beds myself too. It’s also possible to simply pick up a glass bed from eBay.

      I will post here when I hear back.

      • It's all good I ended up just getting the printer and got an Ender 3 glass bed from eBay for $18 (with coupon) - I did my research and a few youtubers said that the Ender 3 glass bed works fine even though it's a little bigger.

        If the manufacturer is happy to do a deal for the printer + glass bed then maybe post it as a new deal so it gets seen more?

        I have never used a 3D printer before but from all the research it almost seems like every manufacturer should be making 3D printers glass beds by default

        • Glass bed is not the best in my experience. Prints are harder to get off than a flexible board.

          If your glass piece is bad quality it maybe warped and not completely flat on all points of the bed which means it will be impossible to level without using bltouch.

          • +1

            @Jaduqimon: Glass is always perfectly flat — unless it is clamped down to a warped surface. Just remember that you only need 3 points to define a flat plane surface. And most printer beds have 4 levelling nuts… which makes it easy to force a warp. Plus the bed heating elements tend to also warp as they are heated.

            I like the glass with a black coating, because it makes PLA and PLA+ prints be simply a dream to remove.

            I’m sorry that I haven’t heard back from my contact yet regarding a deal for the glass beds.

    • +1

      Unfortunately there are no glass beds in stock in Australia, so they are not able to offer a deal on that one at the moment.

  • I'm a complete newbie re 3d printers. Would it be easy to use this printer with relatively simple files gotten off thingiverse?
    Thanks in advance!

    • +1

      Yes it would! Happy to offer pointers to help you get started. :-) Feel free to post links if you want specific suggestions.

      • Thanks! Would PMs be ok?

        • Yes — but preferably not where possible, that way others can possibly benefit too.

  • Not expired, still working at discounted price with coupon code.

  • 75% sold, 3 units left in stock.

  • Are there any guides on putting these things together?
    The manual seems a bit brief

    edit: I will follow this video
    https://www.youtube.com/watch?v=pPxTS4uvFvU

  • Received the printer Monday, unpacked it and and up and running - setup was straight forward and took about half an hour.
    It is printing out the object on the SD card as I'm updating this.
    By the way I see there are programs to install for Windows/Mac - is there something that can run on Ubuntu?

    Thanks again.

    • +1

      Awesome — you should be able to download Cura for linux. The "JG Creat" software is just a rebranded version of Cura. You will find it that Cura also includes a basic profile for the JGAurora / JGMaker Magic by yours truly. 😉

  • I got mine today! I don't think I've even got the space to set it up atm though :'(
    But I'm still tempted to buy another while it's so cheap!
    Is this the ozbargain way??

    • So am I, but my garage is full! 😂 There were only 3 left in stock on tuesday… just checked and SOLD OUT!

  • Received mine yesterday. Quality of the build is better then I expected and it was packed well so I'm confident nothing was damaged in transit. Test print went well too (Took about 29 minutes if memory serves). Would have been nice if the test filament was black not red as I could have used the remaining filament to print something else.

    @pinchies (or anyone else): As I have a Glass bed on the way, when I install it, I take off the existing JGMaker bed and install it + recalibrate the head again? Just double checking.

    • Yep exactly! You may just need to move the Z-axis endstop up slightly in order to accommodate the height difference.

      • Thanks

      • Mine was delivered yesterday, same day as a glass bed that I'd ordered from Ebay (same as link above).

        Some parts have been assembled on arms already, so a bit less to do than the Youtube video linked above. Would definitely take me a lot less time a second time around, and if I wasn't half watching TV in background, but overall, nothing too demanding for anybody that is handy with an Allen key.

        As the glass bed is significantly thicker than the supplied bed though, I've got stumped at the point in the video after "autohome".

        If I use autohome then there is no way to adjust sufficiently to get the nozzle above the glass bed.

        Just re-read and worked out what the Z=axis endstop means, so will try to adjust that up a bit.

        Hopefully, after that I'm good to go for test print run.

        P.S. the 235 x 235mm glass bed is the perfect size, but will need some bigger binder clips to secure as is that much thicker.

        • Awesome :D

        • +1

          Had to increase the height of the "Z-axis Limit Switch" a good 6-7mm above where it was flush with the edge of the Z-motor, but that enabled proper bed leveling for the thicker glass platform.

          Printing the test print G-code on the provided SD card now and seems to be progressing fine (better not speak too soon :-)).

          For ~$184, including the glass bed from Ebay (which has Creality branding on platform and box) cannot complain about that price for dipping my toe into 3D FDM printing.

          Time to get up and running wasn't too onerous either. I did it in fits and starts over one evening and one morning, but If you have a fair chunk of a day on a weekend to tinker and learn then should be up and running by the afternoon.

          Fan and step motor noise is significant but not terrible. Means you're not going to keep it in an area where machine noise might be a problem, but if you're used to old tower PCs with massive power supplies and their high air volume pushing fans, probably not going to worry you much.

          A few minor mis-steps that are probably inherent in the learning process, but really no big hurdles to anyone even a little technically-minded.

          Now to start working out how to get the G-code for a range of little parts for odd repairs around the house.

          If I could, would give OP another positive vote.

  • I was about to get this glass bed, as it is cheaper.
    https://www.ebay.com.au/itm/174542347951

    Or is it better to go for something else?
    Thanks for any suggestion.

    • Any glass with that black glass frit coating — ultrabase, superplate, carborundum, just as long as it is the right size for this printer. Just check — I think you want 220x220mm not 235x235.

      • Thanks, I think I'll get the one on eBay - The black plastic bed and heater the printer came with looks like it's 235x235

        • +1

          I don't know about you @repeat but I had a lot of issues levelling the bed correctly with the glass bed installed, I was having a lot of issues when printing because it just wouldn't level correctly despite numerous attempts. I have gone back to the default bed and haven't had an issue since, been using a layer of painters tape so I don't have issues with the prints sticking - Highly recommend it.

          Apart from that it has been an amazing printer I'm quite surprised how well it works.

          Disclaimer: I definitely removed the existing bed before installing the glass bed.

          • +1

            @Empharand: I also have had a trying experience with "levelling" - I would always end up with the front left corner sitting 1-2mm lower even with the spring fully undone.
            Anyhow the latest attempt has been to take the upper cross-member off, then adjusting what I am imagining the elliptical adjustment screws on the inner rollers at the ends of the x-axis, (then checking the tension still ok and putting it back together) - it seems to be getting closer.

            In the meantime I have set up a raspberry pi with octopi so I can have the printer in the garage and use it over wifi.
            https://octoprint.org/

            I will try again tomorrow.

            • @repeat: I've had the same endless dramas with bed levelling since installing the glass bed.

              Have tried replacing springs with silicon ones and no joy, including varying the silicon spring sizes by a few mm at the corners that seem to need more or less.

              This was good to dip my toes and get me onto the 3d printing learning curve, but got so frustrated that ended up buying the Aquila X2 when on sale at Amazon (only about $45 more than this afte upgrades) and have had a much more pleasant experience with levelling and print quality.

              @repeat have you had any joy with the glass bed levelling yet?

              I may stick to the Aquila, but if I can get this functional again will maybe give to a relative or my kid's school.

              • @opposablethumbs: Yes after fiddling with the eccentric? screw on the LH inner wheel on the x-axis, it seemed to fix the drop off when going left to right, fixed it for me and has been working great ever since.
                There was a YT video about doing this on an ender, the important thing was to loosen the screws on the top, release the z coupling and continually check that the rollers could move freely along the z axis as you make small adjustments to the screw.

                Printing via rpi/octoprint/webcam has taken it to another level also.

                I hope you can get your one back up and running.

                • @repeat: Thanks @repeat, just trying to visualise which one you mean by the "eccentric" x-axis screw on LH side.

                  Is that the biggest allen key size one at furthest left that tensions x-axis belt?

                  • +1

                    @opposablethumbs: The brass hexagonal section that is on the axle of the inner rollers that run up and down the vertical extrusions. It needs an open spanner to adjust it (which should be in the supplied tools).
                    You need to make sure it is still able to freely move while you are adjusting it.
                    I followed this:
                    https://3dsolved.com/ender-3-x-axis-sagging-how-to-solve/

                    See the section titled "Adjust the Eccentric Nuts" for how to adjust them.
                    See the gif showing "X Gantry is sliding up and down perfectly with no roller feeling loose or too tight" for how to test while you are adjusting.

                    • @repeat: Thanks so much for that link, has solved my problems with bed leveling and able to print successfully again now.

                      Have intalled silicon "springs" so will see if that reduces how often I need to level the bed, although the back left corner still requires a lot less tension than the other corners.

                      Did you remove the little U-shaped back cable holder that is held in place by the back left spring screw, as this seems to add a couple of mm to the total height?

                      I've kept it in place for now, just used a silicon spring that is a few mm shorter than those in the other corners.

                      Next print out is to make the drag chain you linked below :-).

                      • +1

                        @opposablethumbs: That 's great to hear you fixed the levelling issue, well done.
                        The drag chain took ages to print out (I think around 8-9 hours or so) - my one printed leaving whiskers everywhere (maybe too hot) so was a mess to clean up. I think it needed 1x large bracket 1x small bracket and 15 linkages.
                        I printed out one too many small brackets and had one linkage too many also.
                        https://imgur.com/a/uuKQZax

                    • +1

                      @repeat: Should have been back right spring screw that holds the U-shaped cable holder (if you're looking from front).

                      • +1

                        @opposablethumbs: I put the U shaped retainer back in together with the large drag chain bracket, it was a bit tricky to keep the holes aligned.

                        • @repeat: Thanks for all the help :-).

                        • @repeat: Finally printed all the links and retainers.

                          Did you have to use a smaller spring for back right than for the other corners after putting in the large drag chain bracket and U-shaped retainer?

                          • +1

                            @opposablethumbs: Well done on getting the links done.
                            I just used the existing spring - was a bit tricky getting it all together including the u-clip.

  • Update: working great now.
    I installed the octoprint plugin in Cura and now the printer is integrated there also.

    I was wondering if others have noticed the cabling (wrapped in nylon netting) coming from the bed to the base is constantly bending into the y-axis belt idler gear while printing I am wondering if there is a known solution to this.

Login or Join to leave a comment