

Marketplace
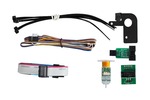
Hey guys, looks like an amazing price on a Creality BL touch kit - around $50+ elsewhere.
Great for those who are interested in auto bed levelling (an essential, really) or handy as a spare.
This probe is to help automatically work out where the bumps and dips are on the print bed (printing surface) of a 3d printer so that your prints adhere properly and, generally, increases the chance of a successful print.
EDIT: Due to bargaino's perhaps unnecessarily excessive comment, I've added a description of what this is used for.
Legend.
Great price. Had one and caused me more headache than help. Best thing I ever did for levelling was replace the bed springs with silicone spacers.
What issues did you face? I feel like there's a lot that can go wrong in 3d printing, even with perfectly functioning equipment, and a tonne of variables that can impact.
Honestly don't remember exact specifics. It's a long time ago, but I remember installing it and having to continuously fiddle with it and level. Ended up tearing it down after a few weeks. Now with the silicone spacers the need to level the bed has become rare. I highly recommend them and the my are only a few dollars. Not to say bltouch is not good, it may have been human error, and probably was.
Levelling the bed screws is important but that alone won't account for a warped bed with various high/low zones. You could manually create a bed mesh but you'd be crazy to do so manually. You'd have to be so lucky to have a flat bed, otherwise a bed levelling sensor + silicone spacers or upgrade yellow springs is the way to go - well worth the effort when everything is configured and working.
+1 for silicon spacers, the springs used to always need levelling - say one in 3 prints, with silicone you were lucky if you had to do it for every 20 if that.
I got the yellow die spring upgrade for about $10, I've re leveled it once over the last two years, after upgrading firmware.
I bought those and had more trouble with them than the original springs so had to swap back. I was constantly having to tweak them more than the standard ones and my front left section I could not get level with the upgraded springs.
Same here. I haven’t levelled mine since the spring upgrade.
Same experience for me. I think it's caused more problems than it solved, but I still can't being myself to go back to manual levelling. Maybe I'll look into silicone spacers and yellow springs…
See my post above - fixing the bed screws is one thing, but the probe is also to create a bed mesh - so both work together.
I second this. I did both.. as well as upgraded the mainboard to 32bit. Wish I did it forever ago!
I have been using the BLtouch sensors on various printers ever since the sensors were first released. As long as you configure the Z offset correctly (That can be tricky) they work very very well.
If you need to ask it's obviously not for you.
Do your own research, lazy bones
Relax man
Do you really browse ozbargain thinking "oh I have absolutely no idea what this item is, but it's $20 down from $50, better research it"?
@OZKap: They skim the items. Try reading a list - you pause to try to understand something that looks like gobbledygook. Psychology 101.
When one person is writing for thousands, it is lazy not to be clear.
Look how much time you've wasted from other people with your little anneurism.
How ironic.
To be fair I had to click on the link and scroll halfway down the description to work out what it was for. Would be good to mention what it is in the title.
It's like posting a half price Berlikoff x17 Alpha mkII and not mentioning what the hell it is.
https://letmegooglethat.com/?q=creality
You're not complaining about posts like. "Western Digital Blue SN570 1TB PCIe Gen 3 NVMe M.2 2280 SSD $89 (Plus $20 Gift Card) + Delivery ($0 SYD C&C) @ JW".
Yes, it would be good practise to say "hard drive". I may well be wrong, but i suspect most readers would recognise it though. This post is taking obscurity to a greater extreme.
Well you'd be wrong calling it a hard drive as well.
@bargaino: Mate, why are you so angry? Just a simple "what is this?" (Referring to your original comment) would've sufficed.
Hard drive and hard disk drive are fairly interchangeable, so I think @Tacooo was just try to making the point that the example is for a SSD (nvme format, to be exact), not a HDD (or hard drive, as you mentioned).
@anthman: Hey, its cool. I even put in a smiley just then, in case i unintentionally came across as angry instead of mildly peeved in the original post.
But if people can't have a bit of fun debating, what's the point?
It's to help automatically work out where the bumps and dips are on the print bed (printing surface) of a 3d printer so that your prints adhere properly and, generally, increases the chance of a successful print.
Since when do we label what the items are for in the title ? Funny that it isn’t a role… almost like you will know if it applies to you or you can ask.. or God forbid Google it…
Damn, I gave in and bought one two weeks ago and installed it. But thanks OP for finding the deal!
Would this work with the Voxelab Aquila X2?
Also want to know.
Should do as both are 32-bit. Not 100% sure though.
Have you actually had to level the bed much though? I don't think I've levelled mine since setting it up - and it only took a minute to level.
The collective internet suggests it does with the right firmware upgrade. This post has advice around installing - i.e. leave the z end stop plug connected on the mobo only. https://www.reddit.com/r/VoxelabAquila/comments/st4nl9/aquil…
Thanks for the post!
I think I paid around the $50 mark, so great price for this kit. Just a heads up for Creality users: if installing this on a 4.2.7 silent board, you'll need to switch the positioning of the ground and VCC wires. The ordering of the pins on the pin 27 board that comes with this kit does not match the ordering of the pins on the silent board (not sure about other creality boards).
Found this caused more problems than it was worth
Personal experience?
Sounds more like you had other issues on your end if that was the case.
Given its now a standard requirement on all modern printers, it is definitely worth it
Also got glass bed upgrade for $15 if you're interested.
https://www.kogan.com/au/buy/upgraded-3d-printer-glass-bed-s…
and a metal extruder kit $10:
https://www.kogan.com/au/buy/creality-aluminium-mk8-extruder…
Make sure to check if it's free delivery under Kogan First!
The metal extruder definitely does, since that's what I bought.
Just got the Kogan first trial for this then immediately cancelled.
I grabbed the Metal Extruder too.. free for Kogan First.
I have the others already, well, equiivelant of the others.
Creates more headache than what it solves.
Agreed.
Damn, that's a solid price, pity about the shipping!
It's free shipping with the free Kogan first trial.
No bueno for NT, no postcodes eligible
Sorry to hear, how much are they charging to post to the NT?
@anthman: $16.99 which still makes it a reasonable price but not a must buy. I'll just deal with my manual mesh for now
It's only giving me a 50% discount on shipping. Anyone have any idea why?
Might depend on where you live. Still shows as free shipping for me (I'm in metro Sydney)
@Wheresmyspaceship: Have you tried adding it to cart and see in cart if it shows the Kogan first trial membership in cart as well, and see what the shipping is then. Should be something like "Free with Kogan first" as the first option before (paid) express.
My opinion on an auto bed leveler:
It's okay.
I still have minor bed adhesion issues even with bed leveling (might not be the fault of the BL touch)
It required me to install custom firmware and remove the z sensor switch
The auto bed leveling adds a few minutes to each print (unless you disable it)
The cable provided might be a bit in the short side
On my Voxelab I solved adhesion issues by always putting some Elmer's purple glue on the bed.
Some things that have helped my adhesion:
* Print with a brim (made a huge difference)
* Make sure z offset allows for a good squish - the brim lines should be touching each other.
* Depending on material, increase the bed temp, potentially slow down the first layer and make sure print cooling is not on for the first layer (or three)
Pei is great but also found a kingroon plastic magnetic sheet to be super "sticky" but Id try the things above first. Good luck!
Bed adhesion issues has nothing to do with ABL, and everything to do with your Z offset, a clean bed, the kind of surface you're printing on, filament/bed temp and a few other variables
Id argue the "valleys" / "pits" in your print bed would cause adhesion issues at those spots - i.e. the bed is lower than the print thinks it is and therefore doesn't compensate for those low spots - hence the filament not getting properly squished into those zones and not adhering properly as a result.
Just to confirm though, im talking about use the probe to create a mesh to solve for these adhesion issues, not the bed levelling (i.e. adjusting the 3 or 4 bed screws).
The Trianglelab one from Aliexpress I can recommend for the Aquila
Crapality JUNK
I think it's a genuine BL Touch though, by Antclabs.
These are awesome! Especially with klipper. They can also help LEVEL your bed; bring used as a digital probe to tell you exactly how much to adjust the screws by.
I have a Biqu BX and an Anycubic Mega Pro (thanks Ozbargain), an Anycubic Chiron and Max, though the Chiron and Max are heavily modified. I have an inductive probe on the BX and prefer the BL Touch - inductive probe had been I pain in the ass (but I think this was issues from factory).
If you're having bed issues, start with cleaning the bed thoroughly, then level the bed (best you can) by hand, paper test (or with the BL Touch), using the probe, THEN bed mesh.
Finally worked for me in this manner…
I've used 3D touch, BL touch and CR TOUCH, of the 3 my preference is CR touch. 3D touch and BL touch are good though and on similar level.
Can't go back to no ABL now after using Klipper and ABL for so long.
Just be careful that the pin-out for the bl-touch matches that of your controller board. I bought one a couple of years back that was an official kit, but the pin-out was wrong and burnt out my controller board (freshly purchased silent version).
How did the bl touch burn out your board? I’ve had it wired incorrectly between different boards and systems without realising several times and at most i just needed to reverse them. This also seems to be the case for people mentioning it online
Not like it’s sending a lot of power through it or back to the board soo it’s odd itd blow your board
I don't recall exactly as it was a couple of years ago, but from memory the smoke escaped from one of the major components (possibly CPU). The bl-touch managed to survive though.
I've taken a look at my photos of the blown up board. I was wrong on what it took out. It blew the surface mount fuse F2, but not sure what else may be damaged.
Sold out when you try to add to cart :(
good stuff.
Brilliant stuff dude, thank you